Creating Articles
Articles are long-form text content perfect for in-depth storytelling, thought leadership, and detailed information sharing. This guide walks you through creating compelling articles that educate, inform, and build authority with your audience.
Prerequisites
- You must have access to an Organization with at least one Media Page set up
- You need Member, Admin, or Owner permissions to create content
- Content ready for publication (text, images, videos as needed)
Getting Started
- Navigate to your Media Page content creation area
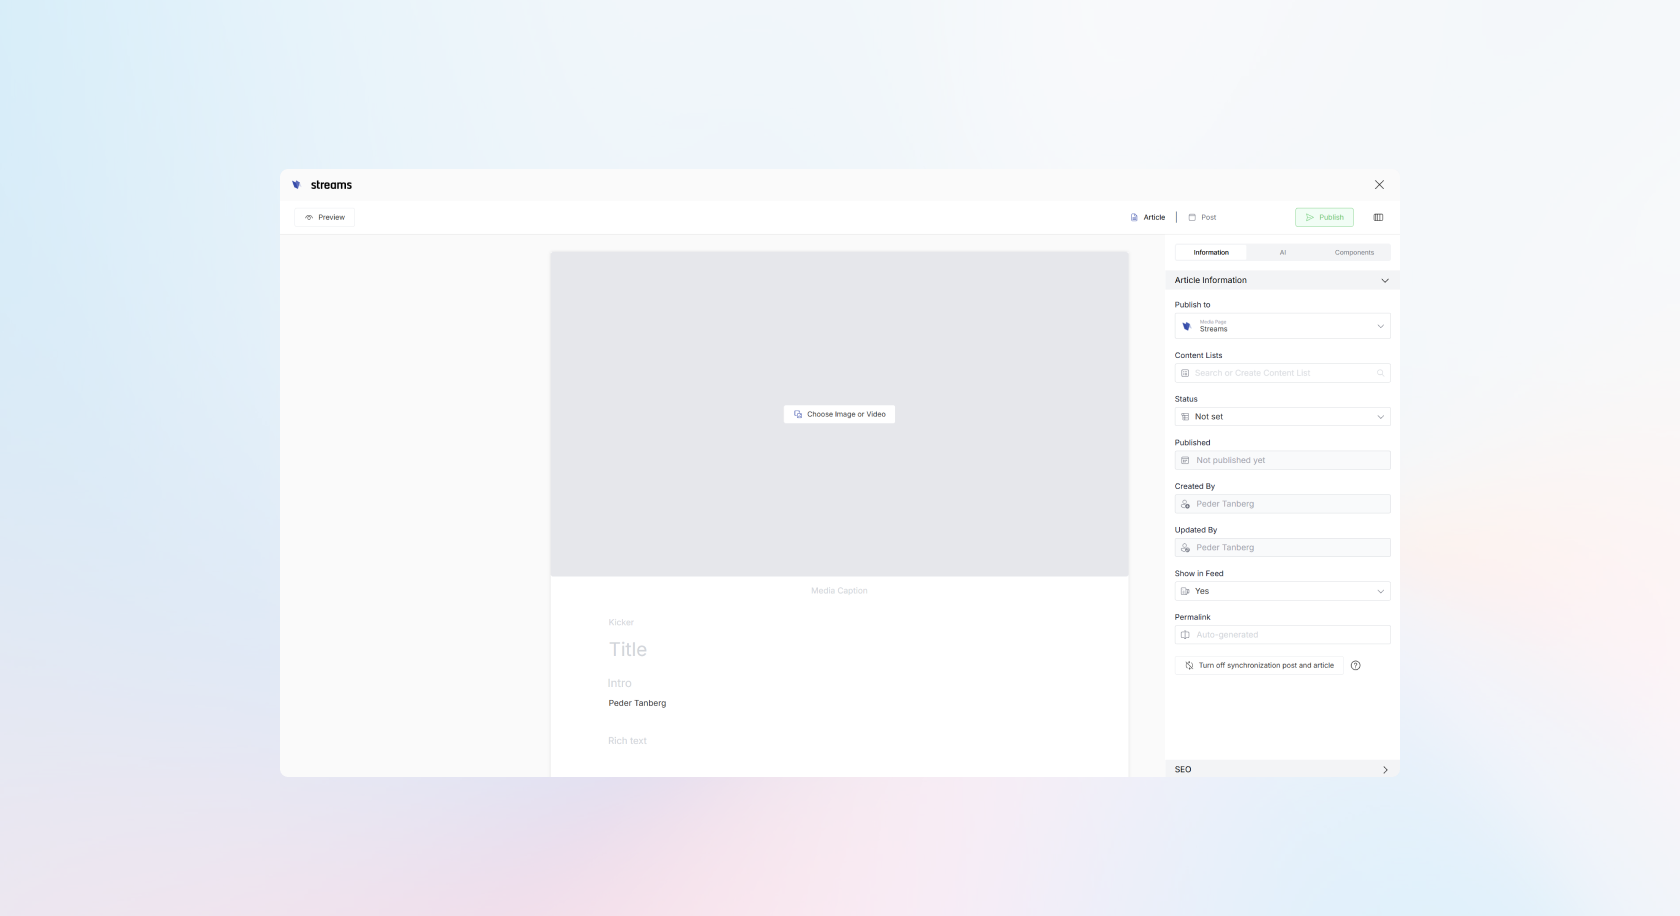
- Click Create Article to open the article editor
- The editor opens with a rich text interface and configuration panel
Step 1: Essential Article Elements
Required Fields
Article Title
- Enter your article title in the Title field
- This appears as the main headline of your article
- Keep it engaging and descriptive
Hero Image or Video
- Click "Choose Image or Video" in the main content area
- Upload your hero media that will appear at the top of the article
- Required: Every article must have a hero image or video
Media Caption (Optional)
- Add a caption for your hero media
- Use this to credit photographers or provide context
- Appears below the hero media in the published article
Optional Elements
Kicker
- Add a short phrase or category label above the title
- Useful for article categorization or branding
- Examples: "Industry Insight", "Behind the Scenes", "Tutorial"
Intro
- Write a compelling introduction or summary
- This text often appears in article previews and social shares
- Keep it concise but engaging
Author Attribution
- The author field defaults to your name
- Click on the author field to change attribution if needed
- Useful for guest posts or team attribution
Step 2: Writing Your Article Content
Rich Text Editor
The article editor supports multiple content types through a rich text interface:
Text Formatting
- Use the toolbar for basic formatting: bold, italic, lists, etc.
- Choose from different paragraph styles using the dropdown
- Create structured, readable content with proper headings
Adding Content Sections
- Hover over the article body area to reveal a blue line with a plus (+) icon
- Click the plus icon to add new content sections
- Choose from available content types:
- Rich Text: Additional paragraphs and formatted text
- Image: Insert images throughout your article
- Video: Embed videos within the content
- Media Gallery: Showcase multiple images or videos
- Facts: Add highlighted fact boxes or statistics
- Byline: Include author information or quotes
Content Organization Tips
- Break up long text with images or media galleries
- Use fact boxes to highlight key statistics or insights
- Add videos to demonstrate concepts or provide visual interest
- Structure content with clear headings and sections
Step 3: SEO Optimization
Configure your article for search engine optimization in the SEO section:
SEO Fields
Title for Search Engines
- Write an SEO-optimized title (recommended: less than 70 characters)
- This appears in browser title bars and search results
- Can be different from your article title for optimization
Description
- Create a compelling meta description (recommended: 70-160 characters)
- This appears in search engine results below the title
- Should entice readers to click through to your article
Metadata Keywords
- Add relevant keywords that describe your article content
- Separate multiple keywords with commas
- Focus on terms your audience might search for
Google Preview
- Review how your article will appear in Google search results
- Adjust title and description based on the preview
Step 4: Publication Configuration
Article Information Panel
Publish Target
- Publish to: Select your target Media Page (auto-selected by default)
- Alternative: Choose "None" if the article shouldn't appear on your Media Page
Permalink/Slug
- Important: Manually enter a URL-friendly permalink
- Example: "how-to-create-engaging-content"
- Warning: If left blank, a nonsense string will be generated
- Use hyphens instead of spaces, keep it descriptive and concise
Content Organization
- Content Lists: Add to relevant content lists for website categorization. A content list could i.e be Landing Page Articles.
- Status: Choose from Ideas, Draft, Review, Scheduled, or Published
- Show in Feed: Control visibility in community feeds (default: Yes)
Author & Timestamps
- Created By: Shows the original author
- Updated By: Shows who last modified the article
- These fields update automatically
Step 5: Preview and Publish
Preview Your Article
- Click Preview to see how your article will appear
- Preview Options: View on both mobile and web layouts
- Review: Check formatting, media placement, and overall flow
- Iterate: Return to editing if adjustments are needed
Publishing Options
Immediate Publication
- Ensure status is set to "Published"
- Verify your permalink is properly set
- Click the green "Publish" button
- Your article goes live immediately on the selected target
Save for Later
- Select appropriate status (Draft, Ideas, Review, or Scheduled)
- Click the corresponding action button
- Article is saved but not published
Review Workflow
- Set status to "Review" for team approval
- Content appears in the Overview workflow board for other team members
- Collaborative editing and approval process
Best Practices
Content Quality
- Structure: Use clear headings and break up long paragraphs
- Media: Include relevant images and videos to enhance readability
- Value: Ensure your article provides genuine value to readers
- Length: Aim for comprehensive coverage of your topic
SEO Optimization
- Keywords: Research and include relevant keywords naturally
- Meta Data: Write compelling titles and descriptions
- Permalinks: Create clean, descriptive URLs
- Internal Linking: Reference other relevant content when appropriate
Engagement
- Hook: Start with a compelling intro that draws readers in
- Visuals: Use images, videos, and fact boxes to maintain interest
- Call-to-Action: End with clear next steps for readers
- Social Sharing: Enable social interactions for broader reach
Technical Considerations
- Mobile: Preview on mobile to ensure readability across devices
- Load Time: Optimize images and videos for fast loading
- Accessibility: Use proper heading structure and alt text for images
Troubleshooting
Common Issues
- Missing hero image: Ensure you've uploaded a banner image or video
- Poor SEO preview: Adjust title and description length and content
- Broken permalink: Manually set a descriptive, URL-friendly slug
- Formatting issues: Use the rich text editor tools for consistent styling
Content Organization
- Lost content: Use Draft status to save work in progress
- Version control: The system tracks creation and update timestamps
- Team collaboration: Use Review status for approval workflows
Related Resources
- Posts Overview - Understanding different post types