Creating Streams
Streams are curated collections of content arranged in pages, designed to put your content in context for maximum relevance and engagement. They replace the traditional "Chapters" concept and provide a structured way to showcase your photos, short videos, and products in compelling, scroll-friendly experiences.
What are Streams?
Streams allow you to create contextual content experiences by organizing your content into themed collections. Each stream consists of multiple pages that users can navigate through, creating an immersive storytelling experience. You can use streams in widgets, on websites, or display them directly on your Media Pages.
Prerequisites
- Access to an Organization with at least one Media Page
- Member, Admin, or Owner permissions
- Existing content (short videos, photos, or products) to include in your stream
Getting Started
- Navigate to the Streams section:
https://app.streamscloud.com/streams - Click "New Stream" to open the creation dialog
- You'll see three tabs: Information, Settings, and Content
Step 1: Stream Information
Required Fields
Title
- Enter a descriptive title for your stream
- This appears as the main identifier for your stream
- Make it clear and engaging for your intended audience
Cover Image
- Upload a cover image that represents your stream
- Auto-assignment: If you add short videos in the Content tab, a cover will be automatically assigned
- Manual override: You can change the cover later in Stream Settings if needed
Optional Fields
Sub Title
- Add a descriptive subtitle to provide additional context
- Only appears if you include it
- Useful for explaining the stream's purpose or theme
Available From
- Select the target Media Page where this stream will be published
- Functions the same as the "Publish to" setting in posts
- Choose "None" if you don't want the stream to appear on a specific Media Page
Step 2: Stream Settings
Configure how your stream behaves and appears:
Status Options
- Ideas: Save as a concept for future development
- Draft: Work in progress, not visible to audience
- Review: Submit for team approval
- Published: Make live and accessible
Feed Visibility
- Show in Feed: Control whether the stream appears in community feeds
- Default setting is typically "Yes" for maximum visibility
Categories
- Purpose: Group streams by theme or topic
- Examples: "Inspiration", "Guides", "Product Showcases"
- Benefits: Helps with organization and content discovery
- Search for existing categories or create new ones
Step 3: Adding Content
Switch to the Content tab to build your stream:
Content Types
Streams can include:
- Short Videos: Vertical video content
- Photos: Image content
- Products: Items from your product catalog
Building Your Stream
Pages Structure
- Stream Pages: Your content is organized into pages within the stream
- Page Order: The arrangement in "Pages in this Stream" determines playback sequence
- Drag to Reorder: Rearrange pages by dragging them to set the correct flow
Adding Content
- Browse available content in the lower section
- Select content pieces you want to include
- Content automatically creates pages in your stream
- Cover Assignment: The first short video added may automatically become your cover image
Content Organization Tips
- Logical Flow: Arrange pages in a sequence that tells a coherent story
- Content Mix: Combine different content types for variety and engagement
- Strategic Ordering: Place your strongest content early to hook viewers
Step 4: Advanced Editing with Stream Editor
For more control over your stream's design and layout, use the drag-and-drop editor:
Accessing the Editor
- Navigate to your streams list at
/streams - Hover over your stream card to reveal options
- Click the list with pen icon to open the drag-and-drop editor
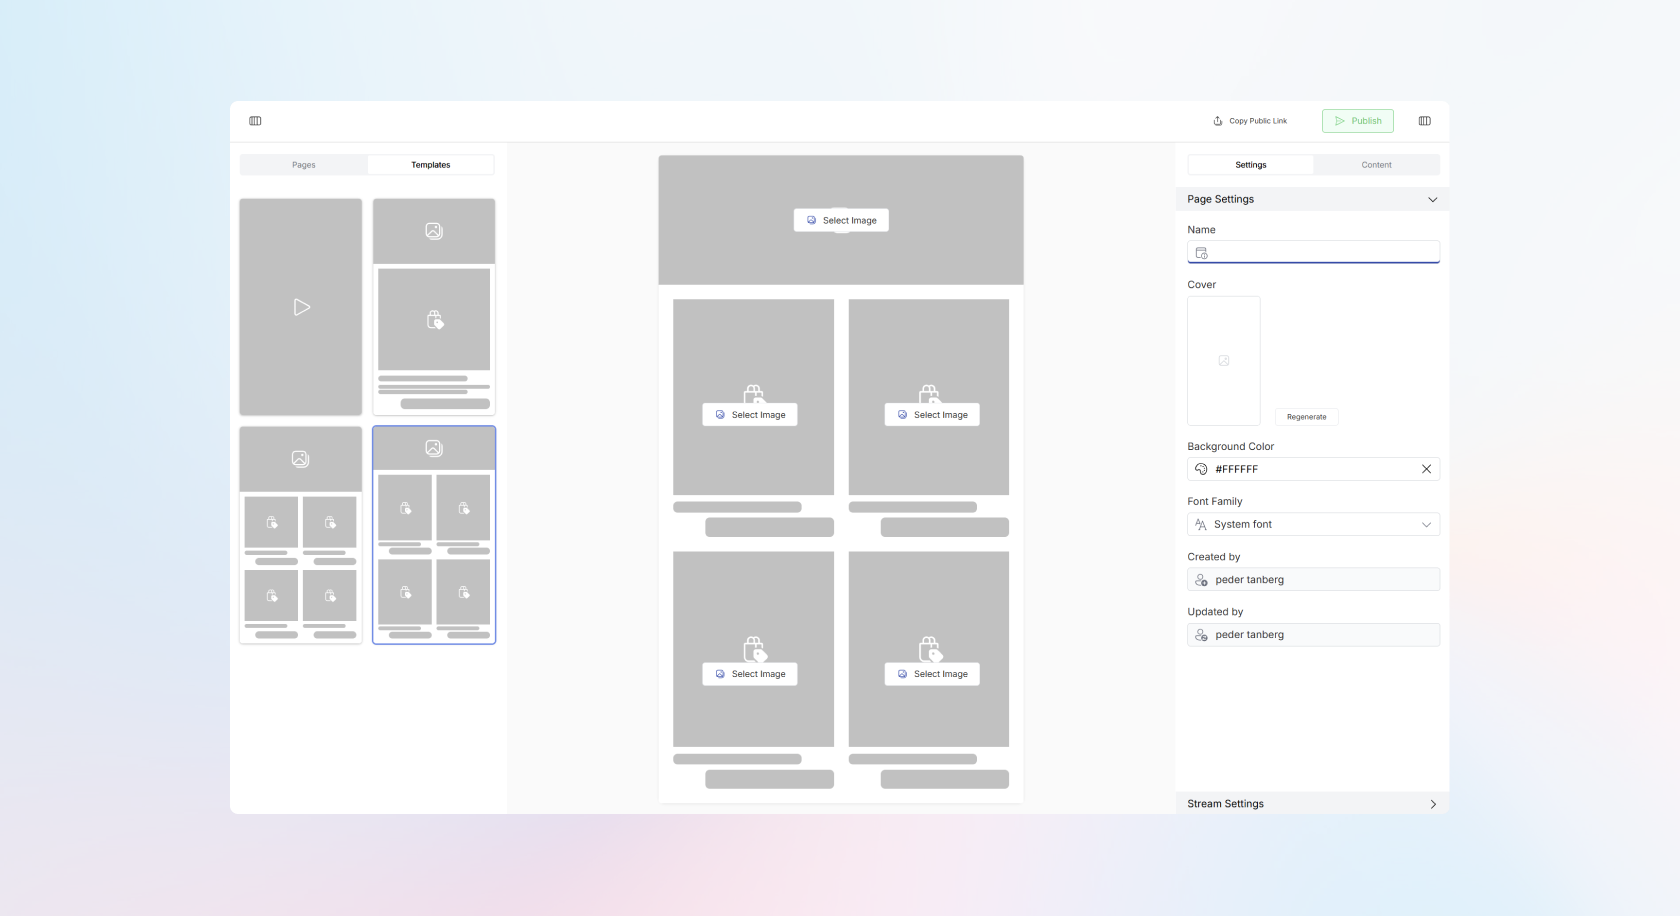
Editor Interface
Left Sidebar: Pages and Templates
- Pages Tab: Shows all pages in your stream
- Templates Tab: Contains available page design templates
- Adding Pages: Hover between existing pages to see a blue line with plus (+) icon
- Template Selection: Clicking the plus automatically switches to Templates tab
Center Area: Visual Editor
- Template Preview: Selected templates appear with grey placeholders
- Content Slots: Visual indicators show where different content types can be placed
- Real-time Preview: See how your stream will look as you build it
Right Sidebar: Settings and Content
Content Tab
- Direct Placement: Drag content directly into available template positions
- Visual Cues: Clear indicators show where content can be dropped
- Instant Updates: Changes appear immediately in the preview
Settings Tab
Three accordion sections provide different levels of control:
-
Element Settings
- Activation: Only visible when a specific element is selected
- Element-Specific Options: Varies by content type
- Examples: Text color and weight, image object-fit properties
- Granular Control: Fine-tune individual components
-
Page Settings
- Single Page Configuration: Settings that affect only the current page
- Layout Options: Control page-specific design elements
- Page Behavior: Configure how this page functions within the stream
-
Stream Settings
- Global Configuration: Settings that affect the entire stream
- Publication Options: Status, target Media Page, categories
- Stream Behavior: Overall stream functionality and appearance
- Cover Override: Change the automatically assigned cover image
Step 5: Publishing Your Stream
Preview and Test
- Review Content Flow: Ensure pages are in the correct order
- Check Design: Verify templates and content placement look good
- Test Navigation: Confirm the stream flows logically
Publication Options
Immediate Publication
- Set status to "Published"
- Click "Publish" to make your stream live
- Stream becomes immediately accessible via public link and configured targets
Save for Later
- Choose appropriate status (Draft, Ideas, Review)
- Stream is saved but not published
- Can be edited and published later
Public Access
- Public Links: All published streams have shareable public URLs
- Multiple Distribution: Streams can be used in widgets, websites, and Media Pages
- Flexible Deployment: Same stream can appear in multiple locations
Best Practices
Content Curation
- Thematic Consistency: Keep content within each stream focused on a specific theme
- Quality Control: Include only your best content to maintain engagement
- Length Consideration: Balance comprehensiveness with user attention spans
Design and Flow
- Template Selection: Choose templates that complement your content type
- Visual Hierarchy: Use element settings to create clear information hierarchy
- Mobile Optimization: Ensure your stream works well on all device sizes
Organization and Discovery
- Descriptive Titles: Make stream purposes clear from the title
- Effective Categories: Use categories that help users find relevant content
- Strategic Subtitles: Provide additional context without cluttering
Performance and Engagement
- Content Variety: Mix different content types to maintain interest
- Strategic Ordering: Place compelling content early to hook viewers
- Regular Updates: Keep streams fresh with new content
Use Cases
Marketing Campaigns
- Product Launches: Showcase new products with supporting content
- Seasonal Promotions: Create themed collections for holidays or events
- Brand Storytelling: Combine videos, photos, and products to tell your story
Educational Content
- Tutorial Series: Break complex topics into digestible stream pages
- How-to Guides: Combine instructional videos with supporting materials
- Product Education: Help customers understand your offerings
Social Commerce
- Shoppable Content: Integrate products directly with engaging content
- Lifestyle Showcases: Show products in real-world contexts
- Customer Stories: Feature user-generated content alongside products
Related Resources
- Widgets Documentation - Learn how to embed streams in websites
- Content Creation Guides - Creating content for your streams
- Analytics - Understanding stream performance metrics